Article • 3 min read
Tip of the Week: Auto-assigning Tickets
Learn how to automatically route tickets to a particular agent, or agents, in your account.
Last updated March 6, 2024


Today’s tip of the week describes how to automatically route tickets to a particular agent, or agents, in your account. It also describes how tickets from one end-user or organization can be sent by default to the same agent.
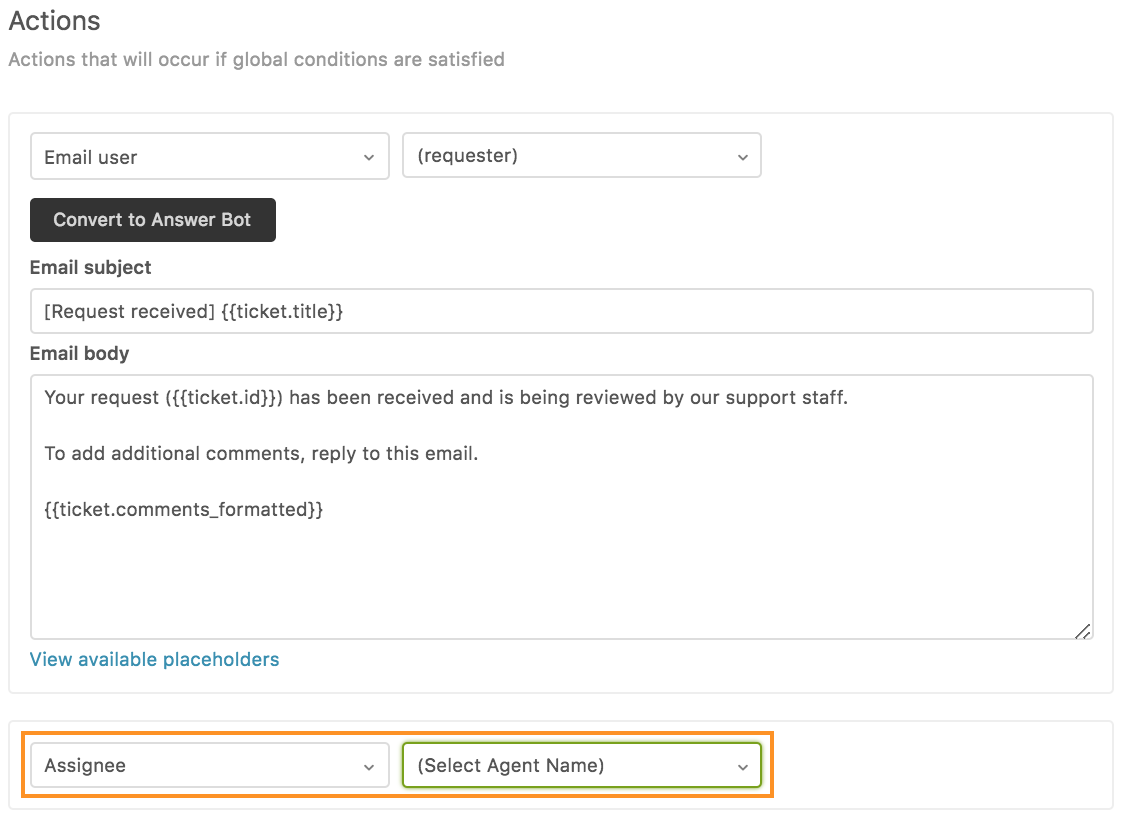
Why would you want to route tickets to one agent or one group of agents? Some customers want all of their inbound tickets to be reviewed by one agent before being escalated or assigned to another department in their company. If this is the case for you and If you are still using the default “Notify requester and CCs of received request” trigger, you can set this up by adding an action of “Assignee” to the trigger. Once you’ve made this modification, your tickets will be assigned accordingly. Please see the screenshot below for what this configuration would look like.
If you’ve deactivated the default “Notify requester and CCs of received request” trigger, then you will need to create a custom trigger that performs this action. When creating the new trigger you will want to utilize the condition “Ticket > Is > Created” under “Meet all of the following conditions”. This will ensure that the trigger fires upon ticket creation. Under the actions of the trigger, you will want to utilize the action “Assignee”, then select the name of the agent you wish tickets to be auto assigned to. Below is an example of what this trigger configuration would look like.

If your company is simply looking to direct all tickets to a specific group, instead of an individual agent, you can use the same logic as suggested above. In this case you would use the action of “Group” instead of “Assignee” when updating or creating your trigger.

Next, we will address how to route the tickets of specific end-users or an organization to one agent or group. There are many reasons why you may want to implement this workflow. Perhaps you want to assure your customer that the same person will be handling their requests going forward or maybe your Zendesk agent is the account manager for one company.
If you’ll be receiving requests from multiple contacts at the same company, you’ll want to set up an organization and either manually add the end-users to this organization or configure domain mapping for the organization. To add an organization in Support, navigate to Organizations, then click “Add organization.” If everyone from “Company ABC” will be emailing you from their @companyabc.com domain, you can enter companyabc.com as shown below.

The domain mapping to organization feature automatically makes an end-user a part of this organization if they email you from their @companyabc.com email address.
If you are looking to have tickets recieved from Company ABC to always be handled by a specific group of agents, you can setup group routing at the organization level. To enable this feature you will want to navigate to the organization in question and adjust the “group” setting on the left of the page to the specific group you want that organization’s tickets to be sent to.

In the event that you are looking to have a specific organization directed to a specific agent you can configure a trigger, much like the auto assign trigger mentioned above. However with this trigger you will want to add the condition “Organization > Is > Company ABC” under Meet All of the following conditions.

In the case that you have one user that needs to be routed directly to one group of agents, you’ll want to enable user tagging as described here. Since the user’s tag (e.g. user_tag) will be appended automatically to each ticket they submit to you, you can route their requests based on this tag as shown below.

Routing tickets to a particular agent or agents in your account is another way to deliver outstanding customer support. This can be done by changing the action of the trigger above from “Group” to “Assignee” and then selecting the desired agent.


